모델 다운로드
https://llama.meta.com/llama-downloads/ 해당 링크에서 LLAMA3 사용 약관을 읽고 동의한다. 그러면 이메일로 LLAMA3 다운로드 링크를 보내준다.
MODELS AVAILABLE
- Meta-Llama-3-8B
- Meta-Llama-3-70B
- Meta-Llama-3-8B-Instruct
- Meta-Llama-3-70B-Instruct
이메일로 온 설명에는 위의 4개 모델이 있다. 8B와 70B는 모델의 파라미터 수를 나타낸 것이고, Instruct는 명령어와 응답 쌍으로 이루어진 데이터셋으로 추가적인 학습을 진행했다는 뜻이다. 따라서 특정한 지시사항을 따르는 작업에 최적화 되어있다. 기본 모델은 일반 텍스트 데이터셋으로 학습되어 광범위한 언어 관련 작업(대화 등)에 사용이 가능하다.
개인적으로 가지고있는 8G짜리 GPU에서 돌려보기 위해 작은 사이즈인 Meta-Llama-3-8B를 다운로드 해보았다.
https://github.com/meta-llama/llama3
위 공식 깃허브를 clone하면 download.sh라는 shell 파일이 있다.
 파일을 실행하면 URL을 입력하라고 뜬다. 여기에 메일에 온 링크를 넣어주면 된다.

sh로 실행하면 안되고 bash 명령어로 실행해야한다…!
받고 싶은 모델의 이름을 띄어쓰기 없이 ,로 구분하여 입력하면 된다. 나는 8B, 8B-instruct를 다운받았다. 8B 모델은 용량이 약 15G 정도 되는 것 같다. 모델당 다운로드에 20분 정도가 소요됐다.
환경 세팅
환경 세팅은 크게 복잡한 것 없이 내려받은 git 폴더에서
pip install -e .를 실행해주면 필요한 라이브러리를 알아서 설치해준다.
실행
torchrun --nproc_per_node 1 example_chat_completion.py \
    --ckpt_dir Meta-Llama-3-8B-Instruct/ \
    --tokenizer_path Meta-Llama-3-8B-Instruct/tokenizer.model \
    --max_seq_len 512 --max_batch_size 6
Llama3의 깃허브 리드미에서는 위와 같은 코드로 실행할 수 있다고 작성되어있다.
나의 경우는 torch 버전이 낮아 torchrun 명령어를 찾을 수 없다는 에러가 떴다. multiGPU 환경을 만들기 위한 명령어이기 때문에 python3 -m torch.distributed.run 명령어로 파일을 실행해주면 된다.
약 1분 정도의 모델 로딩을 거친 후 아래와 같은 결과를 만들어준다.
User: what is the recipe of mayonnaise?

> Assistant: The classic condiment! Mayonnaise is a thick, creamy sauce made from a combination of oil, egg yolks, acid (such as vinegar or lemon juice), and seasonings. Here's a simple recipe to make mayonnaise at home:

**Ingredients:**

* 2 egg yolks
* 1 tablespoon lemon juice or vinegar (such as white wine vinegar or apple cider vinegar)
....
example_chat_completion.py 내부를 보면 아래와 같은 질문들이 작성되어있다.
dialogs: List[Dialog] = [
        [{"role": "user", "content": "what is the recipe of mayonnaise?"}],
        [
            {"role": "user", "content": "I am going to Paris, what should I see?"},
            {
                "role": "assistant",
                "content": """\
Paris, the capital of France, is known for its stunning architecture, art museums, historical landmarks, and romantic atmosphere. Here are some of the top attractions to see in Paris:

1. The Eiffel Tower: The iconic Eiffel Tower is one of the most recognizable landmarks in the world and offers breathtaking views of the city.
2. The Louvre Museum: The Louvre is one of the world's largest and most famous museums, housing an impressive collection of art and artifacts, including the Mona Lisa.
3. Notre-Dame Cathedral: This beautiful cathedral is one of the most famous landmarks in Paris and is known for its Gothic architecture and stunning stained glass windows.

These are just a few of the many attractions that Paris has to offer. With so much to see and do, it's no wonder that Paris is one of the most popular tourist destinations in the world.""",
            },
            {"role": "user", "content": "What is so great about #1?"},
        ],
        [
            {"role": "system", "content": "Always answer with Haiku"},
            {"role": "user", "content": "I am going to Paris, what should I see?"},
        ],
        [
            {
                "role": "system",
                "content": "Always answer with emojis",
            },
            {"role": "user", "content": "How to go from Beijing to NY?"},
        ],
    ]
예시를 보면 Dialogue라는 sequence 자료형 안에 대화 기록이 들어가고 그 Dialogue들의 리스트 형태로 bulk input이 들어간다.
데모 제작
한국어에 대해 모델이 얼마나 잘 답하는지 테스트해보고 싶었다.
위 형태로 파일에 원하는 입력을 넣어 계속 실행해보기에는 모델 로딩 시간이 너무 길어 쉽지 않다고 판단했고 아주 간단한 데모를 제작해서 테스트하기로 하였다.
위 코드를 사용하여 사용자와 1대1 대화를 하는 것 처럼 데모를 만들어 보았다.
example_chat_completion.py의 코드를 조금 변형하여 챗봇 기능을 하는 함수를 제작했다.
ckpt_dir = "모델 weight 폴더 경로"
tokenizer_path = "토크나이저 경로"
max_seq_len = 512
max_batch_size = 6
top_p = 0.9
max_gen_len = None
temperature = 0.6

generator = Llama.build(
        ckpt_dir=ckpt_dir,
        tokenizer_path=tokenizer_path,
        max_seq_len=max_seq_len,
        max_batch_size=max_batch_size,
    )

def conversation(user_input: str):
    user_input = [[{"role": "user", "content": user_input}]]

    results = generator.chat_completion(
        user_input,
        max_gen_len=max_gen_len,
        temperature=temperature,
        top_p=top_p,
    )

    return results[0]['generation']['content']
Claude의 도움을 받아 html과 js 파일을 만들었다.
아래는 데모 실행 결과이다
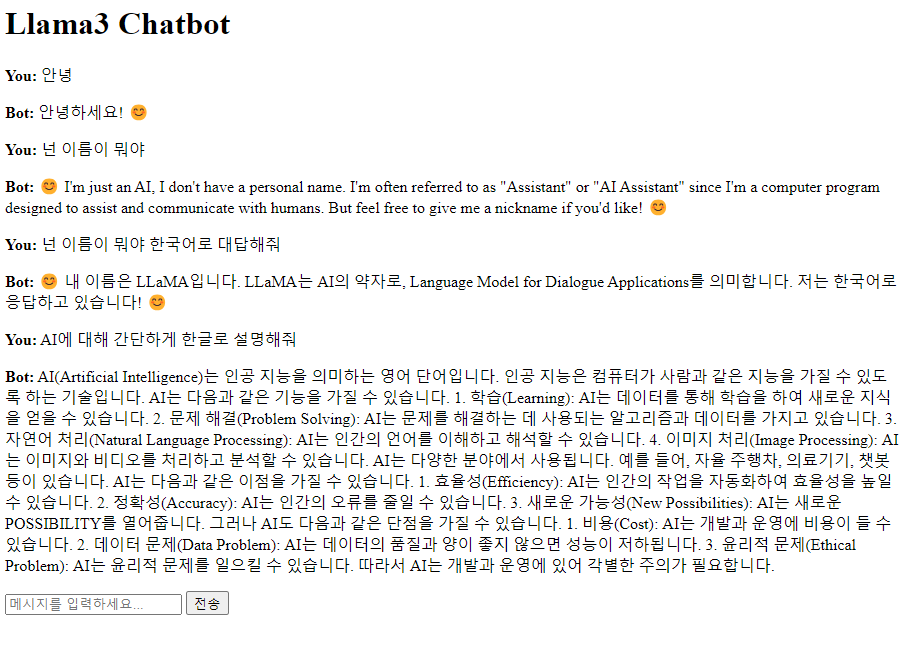 줄바꿈이 프론트에서 적용이 되지 않아 형식이 이상하지만 한국어에 대해서도 자연스럽게 결과가 나오는 것을 볼 수 있었다.
ChatGPT와는 다르게 한국어로 질문을 해도 영어로 답하는 경우를 자주 볼 수 있었다. 한국어로 답해달라는 말을 같이 해야 한국어로 응답이 나오는 것을 볼 수 있었다.
이 부분은 아래와 같이 inference 함수에서 system prompt에 한국어로 답하라는 입력을 넣어서 해결하였다.
줄바꿈이 프론트에서 적용이 되지 않아 형식이 이상하지만 한국어에 대해서도 자연스럽게 결과가 나오는 것을 볼 수 있었다.
ChatGPT와는 다르게 한국어로 질문을 해도 영어로 답하는 경우를 자주 볼 수 있었다. 한국어로 답해달라는 말을 같이 해야 한국어로 응답이 나오는 것을 볼 수 있었다.
이 부분은 아래와 같이 inference 함수에서 system prompt에 한국어로 답하라는 입력을 넣어서 해결하였다.
def conversation(user_input: str):
    user_input = [[
        {"role": "system", "content": "answer in korean"},
        {"role": "user", "content": user_input}]]

    results = generator.chat_completion(
        user_input,
        max_gen_len=max_gen_len,
        temperature=temperature,
        top_p=top_p,
    )

    return results[0]['generation']['content']
8B-Instruct 모델을 사용하였을 때 GPU 메모리 사용량은 16G 정도였다.
다음은 LLAMA3를 간단한 데이터셋으로 학습하는 과정을 진행해보려고 한다.
데모 코드
project/
├── main.py
└── static/
──├── index.html
──└── script.js
main.py
from fastapi import FastAPI, Request
from fastapi.staticfiles import StaticFiles
from fastapi.responses import HTMLResponse
from fastapi.templating import Jinja2Templates
from pydantic import BaseModel

import sys
sys.path.append("llama git 경로")
from llama.generation import Llama

app = FastAPI()

# 정적 파일 서빙을 위한 설정
app.mount("/static", StaticFiles(directory="static"), name="static")
templates = Jinja2Templates(directory="static")

# 모델 및 토크나이저 로드

class ChatInput(BaseModel):
    message: str

ckpt_dir = "~~~/Meta-Llama-3-8B-Instruct"
tokenizer_path = "~~~/Meta-Llama-3-8B-Instruct/tokenizer.model"
max_seq_len = 512
max_batch_size = 6

top_p = 0.9
max_gen_len = None
temperature = 0.6

generator = Llama.build(
        ckpt_dir=ckpt_dir,
        tokenizer_path=tokenizer_path,
        max_seq_len=max_seq_len,
        max_batch_size=max_batch_size,
    )

@app.get("/", response_class=HTMLResponse)
async def read_root(request: Request):
    return templates.TemplateResponse("index.html", {"request": request})

@app.post("/chat")
async def chat(chat_input: ChatInput):
    user_input = chat_input.message

    answer = conversation(user_input)

    return {"response": answer}

def conversation(user_input: str):
    user_input = [[
        {"role": "system", "content": "answer in korean"},
        {"role": "user", "content": user_input}]]

    results = generator.chat_completion(
        user_input,
        max_gen_len=max_gen_len,
        temperature=temperature,
        top_p=top_p,
    )

    return results[0]['generation']['content']

if __name__ == "__main__":
    import uvicorn
    uvicorn.run(app, host="0.0.0.0", port=8000)
index.html
<!DOCTYPE html>
<html lang="en">
<head>
    <meta charset="UTF-8">
    <meta name="viewport" content="width=device-width, initial-scale=1.0">
    <title>Llama3 Chatbot</title>
    <script src="https://code.jquery.com/jquery-3.6.0.min.js"></script>
    <script src="/static/script.js"></script>
    <style>
        #chat-messages p {
            white-space: pre-wrap;
            word-wrap: break-word;
        }
    </style>
</head>
<body>
    <h1>Llama3 Chatbot</h1>
    <div id="chat-container">
        <div id="chat-messages"></div>
        <input type="text" id="user-input" placeholder="메시지를 입력하세요...">
        <button onclick="sendMessage()">전송</button>
    </div>
</body>
</html>
script.js
function sendMessage() {
    var userInput = $('#user-input').val();
    if (userInput.trim() === '') return;

    $('#chat-messages').append('<p><strong>You:</strong> ' + userInput + '</p>');
    $('#user-input').val('');

    $.ajax({
        url: '/chat',
        type: 'POST',
        contentType: 'application/json',
        data: JSON.stringify({message: userInput}),
        success: function(response) {
            $('#chat-messages').append('<p><strong>Bot:</strong> ' + response.response + '</p>');
        }
    });
}

$(document).ready(function() {
    $('#user-input').keypress(function(e) {
        if (e.which == 13) {
            sendMessage();
            return false;
        }
    });
});